
Please fill in the “Change of Company Information Request Form” with authorized signature and company chop and fax the form to our Finance Department at 2516 9177 or email to bhkcust.info@konicaminolta.com.
Please fill in the “Change of Company Information Request Form” with authorized signature and company chop and email the form with all required documents to our Finance Department at 2516 9177 or email to bhkcust.info@konicaminolta.com.
If your machine already out of warranty and you would like to join our service maintenance contract, you should contact our Customer Service Hotline 2565 8181. Firstly we need to inspect your machine (with the inspection charge) to confirm the condition. Quotation will be given if the machine needs to replace spare parts. If the machine is confirmed to be under serviceable condition, we will proceed to signing the service maintenance contract accordingly.
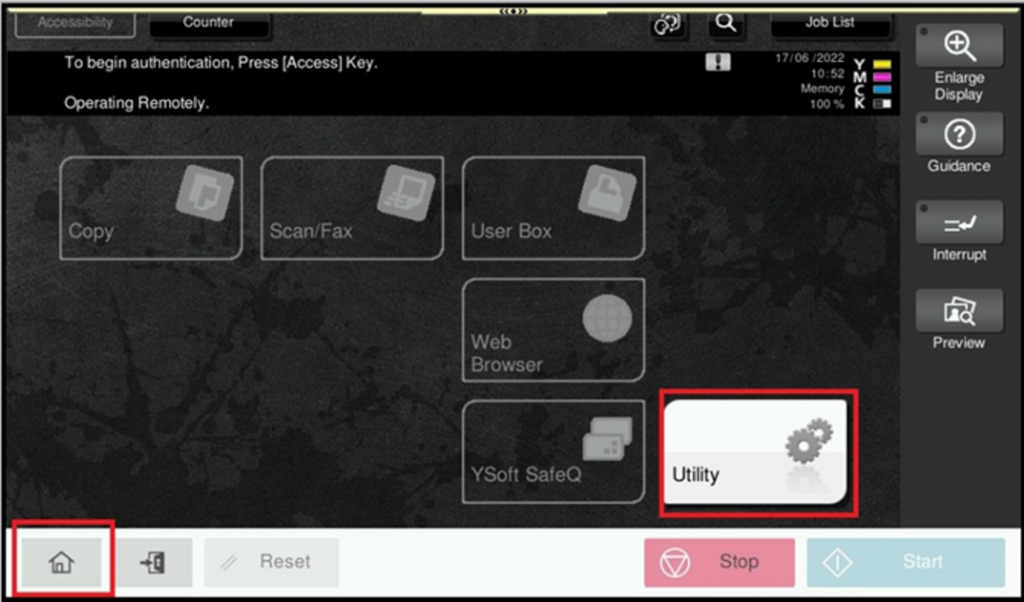
(On MFP touch panel screen) Select “Home” button (On touch panel screen) → Utility → Device Information → IPv4 address
Specify the banner paper size.
1. On the screen of this machine, tap [Utility] – [Banner Printing].
2. Select [Allow], and tap [OK].
3. Check that the system is changed to the banner print job wait state.
When you have finished the above settings, start to print from the PC.
4. In [Original Size] in the [Basic] tab, select [Custom Size].
5. Specify the length and width of the banner paper, and click [OK].
6. Click [Yes].
7. Execute printing.
8. Load the banner paper into the Bypass Tray.
9. When you have loaded a banner paper, tap [Complete].
-> Printing on the banner paper starts. Support the ejected banner paper by hand.
-> To continue printing, execute printing from the computer.
10. Tap [Exit].
-> A message confirming the end of banner printing is displayed. To terminate printing, tap [Yes].
-> If there is a queued job, the job is started.
For details, please refer to attachment below:
Execute a print job on your computer then load envelopes or postcards into this machine to execute a print job on it.
The following explains how to print on standard-size envelopes or postcards loaded into the Bypass Tray.
1. Open the file in the application, and click [File]. Then click [Print] from the menu.
2. Select this product from [Select Printer] (or [Printer Name]), and click [Preferences] (or [Properties]).
3. In [Original Size] on the [Basic] tab, select [Envelope] or [Postcard].
4. Check that [Paper Size] is set to [Same as Original Size].
5. Select [Bypass Tray] from [Paper Tray].
6. Click [OK].
7. Execute printing.
8. Load envelopes or postcards into the Bypass Tray with the print side facing down.
9. Slide the Lateral Guide to fit the size of the loaded paper.
10. Tapping [Complete] starts printing.
For details, please refer to attachment below:
When multiple Microsoft Excel sheets with different print settings are printed at one time, this function prevents the sheets from being printed separately.
In the [Other] tab, check the [Excel Job Control] box.
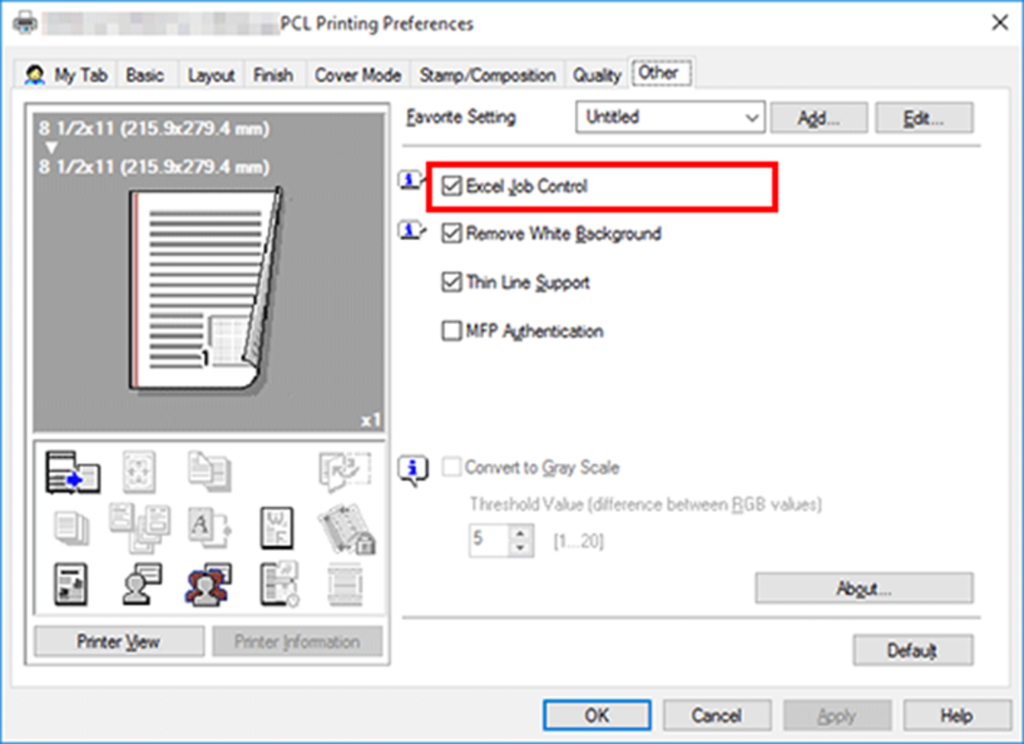
* [Excel Job Control] is only available when the printer driver for Windows is used. However, this function is not available when you are using 32-bit application software in the 64-bit operating system.
The process executed when an overlay image is printed on a PowerPoint original with a white background is optimized. This function prevents the overlay image from being overwritten by the white background of the PowerPoint original.
In the [Other] tab, select the [Remove White Background] check box.

* [Remove White Background] is only available only for the Windows printer driver. However, this function is not available when you are using 32-bit application software in the 64-bit operating system.
Registering E-mail Address:
1. Tap [Utility] – [Utility] – [Store Address] – [Address Book] – [New Registration].
2. In [Select Destination], select [E-mail].
3. Enter destination information.
-> [No.] / [Name] / [Index] / [E-mail]
4. Tap [OK].
For details, please refer to attachment below:
Registering an SMB destination:
1. Tap [Utility] – [Utility] – [Store Address] – [Address Book] – [New Registration].
2. In [Select Destination], select [SMB].
3. Enter destination information.
-> [No.] / [Name] / [Index] / [Host Address] / [File Path] / [User ID] / [Password]
4. Tap [OK].
For details, please refer to attachment below:
Registering an FTP destination:
1. Tap [Utility] – [Utility] – [Store Address] – [Address Book] – [New Registration].
2. In [Select Destination], select [FTP].
3. Enter destination information.
-> [No.] / [Name] / [Index] / [Host Address] / [File Path] / [User ID] / [Password]
-> [Proxy] / [Port No.]
4. Tap [OK]
For details, please refer to attachment below:
Registering a WebDAV destination:
1. Tap [Utility] – [Utility] – [Store Address] – [Address Book] – [New Registration].
2. In [Select Destination], select [FTP].
3. Enter destination information.
-> [No.] / [Name] / [Index] / [Host Address] / [File Path] / [User ID] / [Password]
-> [SSL Settings] / [Proxy] / [Port No.]
4. Tap [OK]
For details, please refer to attachment below:
Exporting a destination file:
1. Start a Web browser, enter the IP address of the machine in the URL field, then press the [Enter] key.
2. Select [Administrator], then click [Login].
3. Enter the password, then click [OK].
4. Click [Maintenance] – [Import/Export], select [Address], then click [Export].
5. Select the type of destinations to export
6. In [File Type], select the file type of the destination file to be exported.
7. In [Export Destination], select [Export to PC], then click [OK].
8. When you are ready to download the destination file, click [Download].
9. Click [Save], select a location to save the data to, then click [Save].
10. When downloading is completed, click [Close].
11. Click [Back].
Importing a destination file:
1. Start a Web browser, enter the IP address of the machine in the URL field, then press the [Enter] key.
2. Select [Administrator], then click [Login].
3. Enter the password, then click [OK].
4. Click [Maintenance] – [Import/Export], select [Address], then click [Import].
5. Select whether to import the backup file for all destination data or import the individually exported destination file.
6. Select [Select from PC], then click [Browse…].
7. Select the destination file to be imported, and click [OK].
8. Click [Import].
9. When the import completes, click [OK].
For details, please refer to attachment below:
Click here to check the model list
The FAQs ONLY covers the following models:
C750i, C650i, C550i, C450i, C360i, C300i, C250i, C227i, BH750i, BH550i, BH450i, BH360i
“Digital Doctor” is one of the most proactive remote diagnostic systems designed by Konica Minolta to perfect customer experience with its powerful bizhub multi-functional product (MFP) series. The system will handle all relevant device alerts, messages and meter readings and requires no effort or attention on your part.
The automated meter reading function means there is no need for you to manually check meter readings or be bothered with keeping track of expiry dates. We will send you the invoices after we have automatically taken the meter readings. It alleviates your administration burden.
The Digital Doctor always ensures your MFP will be kept in top functional condition.
It assures that we always have ample warning from your MFP. Even before you recognise the problem, we are already aware of it. The device will inform us in detail and we can prepare ourselves to help as quickly and as accurately as possible. Troubleshooting will be more accurate and efficient. This translates into better device up-time and fewer headaches for you.
Bank Account Details
| Beneficiary Name: | Konica Minolta Business Solutions (HK) Limited |
| Bank Name: | The Hongkong and Shanghai Banking Corporation Limited |
| Bank Address: | 1 Queen’s Road Central, Hong Kong |
| Currency: | HKD |
| Bank Account Number: | 848-023974-001 |
| SWIFT Code: | HSBCHKHHHKH |
| Bank Name: | Bank of China (Hong Kong) Limited |
| Bank Address: | Bank of China Tower, 1 Garden Road, Central, Hong Kong |
| Currency: | HKD |
| Bank Account Number: | 030-574-0-003039-3 |
| SWIFT Code: | BKCHHKHHXXX |
| Bank Name: | Mizuho Bank, Ltd. Hong Kong Branch |
| Bank Address: | 12/F., K11 Atelier, 18 Salisbury Road, Tsim Sha Tsui, Kowloon |
| Currency: | USD |
| Bank Account Number: | F15-768-210137 |
| SWIFT Code: | MHCBHKHH |
Internet Payment
- Internet banking services provided by banks in Hong Kong. For details, please check with your banks directly.
- You need to enter the Bank Account Number of our Company when paying online. Please take screenshots of the transaction completion screen for your record.
- Please email the screenshot, your customer number and invoice number to ebilling.financecm.bhk@gcp.konicaminolta.com or fax to 2516 9177 for further handling.
Cheque by Mail / e-Cheque
- Mail a crossed cheque to Accounting Department – 43/F, AIRSIDE, 2 Concorde Road, Kai Tak, Kowloon, Hong Kong and made payable to “Konica Minolta Business Solutions (HK) Limited”. Please mark your customer number and invoice number on back of the cheque.
- Email an e-cheque to ebilling.financecm.bhk@gcp.konicaminolta.com and made payable to “Konica Minolta Business Solutions (HK) Limited”. (For details on procedure, please enquire your banks directly or read e-Brochure of Hong Kong Monetary Authority.) Please mark your customer number and invoice number on the remarks section.
In Person
- Counter of HSBC / BOC – Pay in cash or by cheque*.
- Cheque Deposit Machines at HSBC / BOC – Pay by cheque*.
- Cash Deposit Machines at HSBC / BOC – Pay in cash.
- Please email the deposit advice, your customer number and invoice number to ebilling.financecm.bhk@gcp.konicaminolta.com or fax to 2516 9177 for further handling.
*Crossed cheque made payable to “Konica Minolta Business Solutions (HK) Limited”.
Automatic Teller Machine (ATM)
- You may settle your invoice at the HSBC / BOC ATMs.
- Select “Transfer” then enter “Bank Account Number” and “Amount”.
- Upon successful completion of the transaction, a receipt will be issued on the spot for reference and record.
- Please email the receipt, your customer number and invoice number to ebilling.financecm.bhk@gcp.konicaminolta.com or fax to 2516 9177 for further handling.
Autopay
Upon successful application for the following autopay services, your monthly invoice will be paid automatically by debiting your bank account between 23rd to 26th of each month.
Via Savings or Current Accounts
- Customers with savings or current accounts with any bank in Hong Kong can pay invoices via autopay. Please complete the Direct Debit Authorisation Form and return the original copy to your banker. Alternatively, customers may set up autopay authorization via internet banking service provided by some banks. Please contact your bank for details.
- The authorisation process takes about three weeks.
- Service fee may be charged by banks for handling autopay applications. Please contact your bank for more details.
Purchasing Card (selected customers only)
- Email a Purchasing Card to ebilling.financecm.bhk@gcp.konicaminolta.com or fax to 2516 9177 and made payable to “Konica Minolta Business Solutions (HK) Limited”.
- Please mark your customer number and invoice number on the description section.